Thursday, December 25, 2014

Merry Christmas!

It was delightful to have our son and daughter-in-law over for dinner on Christmas Eve.  After midnight Mass we exchanged a few family gifts.  So, now I can share a photo of the T-shirt quilt for my son.

Lots of great memories from his college days sewn into this quilt.

I used polar fleece for the backing and it has no batting.  I'm getting more confident with my quilting, and did much denser quilting on this t-shirt quilt than I have in the previous ones I have made.   Most was done with the walking foot, but there are a couple blocks quilted in free-motion quilting.  I really love how it turned out, and my son loved it too!

Warm wishes to you and your family for a very Merry Christmas!


Sunday, December 21, 2014

Getting caught up

Foggy December day at the lake.
It's been cloudy, foggy and basically just not too cheery outside for the past two weeks here.  Great weather for quilting!

(Half-size) Grand Illusion status:  step 1 - pieces all cut, and 30 blocks done.  step 2 - pieces all cut, and 30 blocks assembled.   step 3 - ALL 60 FINISHED!!!  step 4 - pieces cut but that's all so far.

Last weekend we took a drive up to the Lake and I brought up some quilt tops that were in need of quilting.  The big dining table up north is perfect for spreading out and supporting a quilt while I machine quilt.  It's such a sense of accomplishment to get another UFO a step farther along!

First I worked on Shoo Fly Pie.  I started this one in March 2012, didn't like how it looked, set it aside...ripped out blocks, made more blocks, set it aside....started up again in July 2014 and put the top together and pin basted the layers, set it aside.... You get the picture.  Finally, it's quilted up and the binding is on.  All ready to be hand stitched down.   I usually machine stitch down my bindings, but I will need some handwork projects in January, so I'm getting them ready now.

Next up I quilted the center and first border on a red/white/blue quilt top.   I needed a stencil from home to lay out the next two borders, so packed it back up again for now.  Then I started quilting Baptist Fans on Oklahoma Backroads.  I was able to get a little bit done before having to pack up and head home. But at least there was some progress!

At home this week I worked on a T-shirt quilt to give as a Christmas gift.  Shhh! Don't mention it to anyone.  I doubt the recipient reads my blog, but you never know on that one.  The good news is that the bag of T-shirts is now OUT of my junky laundry room for good!  This is my third t-shirt quilt and the best one so far.  I'm going with denser quilting and it looks much better.  Mostly straight lines with the walking foot, but a couple free-motion areas where I stippled or echoed what was printed on the shirt.  Photos after Christmas!

Thursday, December 11, 2014

Yoyo Wreath

A few more ornaments were added to our Christmas tree today.  The house is slowly gaining it's holiday finery.  I wanted to share this little yo-yo wreath made by my mother.   I have two of them now.  One that she made for my first Christmas tree, and one that had been on my parent's tree for many Christmases.

She cut 3 inch circles, stitched around the edge and then filled them with a little fiberfill batting as she pulled the thread to make yo-yo's.  A dozen yo-yo's threaded together through their centers and tied into a wreath, plus a tiny red bow - so simple!


The navy print is from a skirt and camisole Mom made for me in the 1970's -ruffles, lace and 'prairie style.'  Such sweet memories these little ornaments can bring!  What are some of your favorite handmade Christmas ornaments?

Saturday, December 6, 2014

Cascadia finish

This replica of an antique doll quilt was a recent quilt-along with Lori at Humble Quilts.  This week I pulled out some fabulous vintage fabric (that came from my mother's house) to use for the back and binding.   Mom had made herself a blouse and skirt from this fabric in the 1970's, but I think the fabric was old even then.

All finished!  I added a muslin border to lighten it up a bit and make the tiny blocks 'float'.  It measures 18.5 x 22 inches.


Linking up with other quilters this week at: confessions of a fabric addict

Thursday, December 4, 2014

Album Ornaments

This afternoon I was trying to do some cleaning up in my office/sewing room.  When it was time to take a break I had just been stuffing tiny pieces of fabric into the bag for making ornaments.  Well... as long as they were in my hands...

I made a couple of ornaments using the Album block design from the Pond Dakota Album Quilt that I researched for the Bloomington Historical Society.  A little figuring, but they turned out Super Cute!

Ornaments: Sarah and John P. Williamson signature blocks
1893 Pond Dakota Album Quilt

Just three inches square,but not really difficult.  They are made quilt-as-you-go, using 1 inch by 2 inch strips and strip sets.

There is a holiday party at the Museum this weekend, so I think I'll be up late tonight making some as gifts!

Wednesday, December 3, 2014

Denim placemats: tutorial

My box of old denim jeans is overflowing and my son-in-law has told me already that he has several more pairs to contribute.  Some new placemats might be just the thing to use up some of those jeans.  Better get busy!

Several pairs have flat felled seams on the sides as well as the inseam.   Let's take advantage of those!

Pattern:  If you want to make a pattern, cut a 12 inch x 17 inch rectangle.  Fold into fourths so the four corners are together.  Measure 4 inches from the corners on both sides and trim the corners off in a gentle curve. Open up the pattern.

Step one:  Cut off the bottom cuff, removing worn or ragged fabric.  Cut the crotch seam open by cutting from the front zipper around to the center back seam.

Step two:  Lay the bottom of the leg on your cutting board - front side up.

Step three: Measure up 12 inches from the bottom and cut across. Your placemat will be 12 inches top to bottom.

Step four:  Cut vertically down the center of the front of the leg and open up this piece.  Trim edges if needed so your placemat is 17 inches wide.  By having the seams equal distance left and right of center a plate can sit flat on the placemat.  (If the seams are too close together, or down the center, your dinner plate will be wobbly.)

Step five:  Use your pattern, or Measure 4 inches from the corners in both directions. Round over the edges as shown.  Use a plate if you need help making a smooth curve.  Your placemat should measure 12 x 17 inches.

Step six:  Cut batting from fleece, flannel or batting scraps,  and cut a fabric backing for each placemat.  Sandwich and pin.

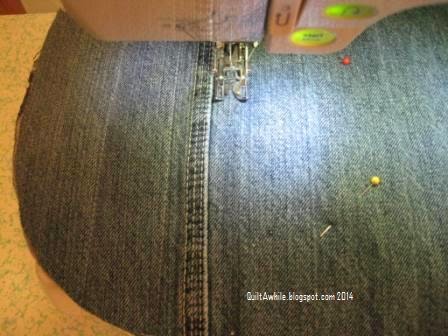
Step seven:  Using a walking foot, stitch on either side of the felled seams.  My stitching lines ended up 1-1/2 inches apart by using the side of my foot as a guide.  Continue to stitch parallel lines about that same distance apart across the place mat.  I used grey thread, but yellow or orange would be great - especially if the color matches the stitching on the denim.

Step eight:  Stitch a generous 1/4 inch in from the outer edge all the way around.  Trim away any uneven edges.  Finish the edge with the method of your choice.  Quilt binding, clipping for a raggy edge, serger edge, or pinking shears are all good options.

Repeat as needed!

Note:  If the jeans are long enough you can get a second placemat, BUT, the inseam starts to curve as it gets closer to the crotch.  After you cut open the leg (but before you round the corners), you can cut along the edge of the inseam and slide the excess fabric under the seam so the fabric lies flat.  Topstitch the seam back down and take a couple of had stitches to tack the seam down if needed.

Tuesday, December 2, 2014

Grand Illusion step one

It's a compulsion.  I simply can't resist a Bonnie Hunter Mystery.  I love every one of them!
Step one of Grand Illusion is out - and I promised myself I'd only make a small version this time.  
Just a couple of blocks...
Well, maybe half size...  
I've cut a few extra pieces... so maybe a little bigger...  
Oh dear!

Week one link up: http://quiltville.blogspot.com/2014/12/mystery-monday-link-up-part-1.html
Looks like there's already over 250 other quilters linking up, so take a look at some of the other color and fabric choices.  No shortage of inspiration in the Quiltville crowd!