Monday, December 24, 2018

A little Hot Dish for Christmas

In spite of the busy holidays I found a little quiet time 
to finish the binding on this dear little baby quilt.  

We did some babysitting for our little grandson while his folks went out to see Holiday Inn at the Chanhassen Dinner Theatre.  After the little guy's bedtime, this grandma was able to finish hand sewing the binding.

The pattern is called Minnesota Hot Dish by Atkinson Designs.  I tried to pick colors out of my scrap bags that reminded me of Minnesota:  leafy forest greens, rich earthy browns and all the blues of the lakes, rivers and sky.

This was so easy to make, and there weren't any seams to match across.  It's one I would make again!

Still in the works before the end of the year are... keeping up with Bonnie Hunter's Mystery Quilt "Good Fortune", finishing Temecula Quilt Company's "Secret Santa", and making the December block from "Remembering Cheri".

Wishing you all a Merry Christmas!


Friday, November 30, 2018

Rose in Winter

A rose colored wall hanging/table topper is on my dear DIL's list for Christmas this year.  An antique ninepatch doll quilt featured in "Celebrate with Little Quilts" from That Patchwork Place was my inspiration.
Rose in Winter  21-1/2 inches square

I used up a lot of little pink and rose scraps from my 1-1/2 inch scrap bag, and used up the entire piece of white/rose for the setting blocks.  Don't you think the vintage/antique look came through pretty well?  Hand sewing down the binding was the perfect handwork project while I did my volunteer time at our Church welcome desk yesterday.

Naturally, when this quilt was well underway, what should appear but another small rose-colored quilt that I had already made- and had completely forgotten about.  Now she can choose which she would like!

Windowpane  16 inches square
This afternoon's project is putting away the autumn quilts and pulling out the Christmas ones!  Let the fun begin!

Wednesday, November 21, 2018

Two little quilts

Bindings are finished on two more little quilts that were in my to-do bag. 

Columbus Day 12" square
A well-timed series of medical appointments gave me time to finish little 12-inch "Columbus Day."  Don't you love the center block with it's sailing ship?  The name came from that ship and the day that I cut it out and did the piecing.

The binding used up bits and scraps from previous binding projects.  Win-win!  The design is from Kathleen Tracy and was one of her small quilt monthly challenges.

The second little quilt was inspired by Vintage Variety from Temecula Quilts.  I had some half-square triangles made up from cut-off corners and they had fairly low contrast.  Perfect spot for them!

Vintage Variation 13x16 inches

Other projects going in the sewing room right now are: 1) a pink table-topper for my DIL that she requested for Christmas.  2) machine embroidery on towels (10) and aprons (4) for the Ashland, WI museum gift shop.  3) machine embroidery on towels (5 so far) for my DD's upcoming craft sale.  4)  Secret Santa Sew Along from Temecula Quilt Company.  5) Remembering Cheri block of the month.  6) sew one more angel costume for the church Christmas program.  7) wondering if it's total insanity to try to start Bonnie Hunter's mystery on Friday. (yes!)  8) fabric is pulled and pre-shrunk for a Storm at Sea quilt.  The blue batik dyes ran so much that my hands turned blue while rinsing them!  But I'm one step closer to making that bucket-list quilt.

We're hosting the family for Thanksgiving tomorrow, which is always a fun (and crazy) time.   I think I'd better go check on the timing for getting the turkey in the oven tomorrow! lol.

As always, I'm so very thankful that you stop by this little blog, and for your encouraging comments.  Blessings and Happy Thanksgiving to you!


Friday, October 26, 2018

Remember Cheri blocks 3-6

With the usual disclaimer that applique' is not my preferred quilting method, I finally got caught up on the Remembering Cheri sew-along blocks this past weekend.  Can I ever procrastinate!

Once I got going, they didn't take all that long.  There are a few tweaks, as Cheri Payne always encouraged us to do, to make a quilt uniquely our own.

The easy October block was the first one I finished.  No hat on my crow, and I went with a smiling pumpkin.  Pumpkins should always smile, shouldn't they?


Next I tackled the schoolhouse for September.  My sticking point on this one is I don't particularly like cats (gasp!)  Finally, I decided to make the cat small and add flowers and a bit of text (though the 'd' looks a little wonky.)

I puzzled over Uncle Sam in the July block for a long time.  The decision was to take out the pie and eliminate the facial features just like the mother and daughter in the May block.  I'm pretty happy with how it turned out. 

The flower in the August block was given a bit of adjustment too.  It was so tempting to put in a nice walleye, but I finally decided to stick with the whale - though it's the only one you may ever see in Minnesota!

Since this is a 'Remembering' quilt, I'm using as much fabric as I can from my father's shirts and cotton pajamas.  Looks good so far!


first section all together

Wednesday, October 24, 2018

Sparkling Windows

This pretty little baby quilt was a fun summer project.  It's been gifted to the adorable first granddaughter of some dear friends, and I think it's finally safe to share it here now.
The pattern is from Quiltmaker Magazine:  Sparkling Windows (May/June 2017 issue.)  I used only 12 blocks to make it baby-sized.

I actually enjoyed making all those hourglass blocks, and the thrifty grandma would be pleased to know that the teal fabric for the blocks, back and binding was a thrift store find!

Sunday, October 21, 2018

The cutest little chick

Isn't this little chicken fabric the most adorable ever??? 

It's been in the stash for a long time, and when I came across some red and white chicken wire fabric for a border the idea for "Cute Chick!" came together.

The block name is, of course, Hen and Chicks.  It's been my summer piecing project at the Lake.  I made as many blocks as I could until I ran out of the black & white print.  Here's the finished top:
 

Pattern from: Quilts from The Quiltmakers Gift by Joanne Larsen Line & Nancy Loving Tubesing.

Tuesday, September 25, 2018

Baskets of Plenty

Over the summer there was a little time to do handwork, and the binding was finally put on my version of Cheri Payne's Baskets of Plenty.

I only made six of the nine blocks.  I enjoy piecing quilts much more than applique, but it was fun to try something different for a change.  And, I needed it to fit in this space in my kitchen for display.

The drab greens in the quilt are from two of my late Dad's shirts, and most of the wool and lace is from my Mom's scrap box.  A great way to remember them.

Cheri Payne designed another quilt called Choose Joy, but I decided that phrase was just what this quilt needed.  It will remind me often that my attitude is a choice that I make.

I can be concerned, but I don't need to be anxious, worried, crabby, or frustrated.

Friday, September 21, 2018

Autumn Sewing Box Scraps

What a busy summer!  I took a break from quilting as I researched and prepared our Bloomington Heritage Days history displays.  The event was last Saturday - amid nearly record 90 degree heat and humidity.  It was deemed a success in spite of the weather, and now, in a swift Minnesota turn around, we have 53 degrees with over 5 inches of rain yesterday. 

Perfect Quilting weather!  And I can't believe how excited I am to get back to piecing and quilting again.  (Well, there was one summer project - a baby quilt that I can't share yet.)

Our rainy week was a good time to catch up on Kathleen Tracy's small quilt challenge.  Sewing Box Scraps, from her book A Prairie Journey was the August challenge.  I pulled out my 1-1/2 inch scrap bag to see what was there.  Not many light neutrals, but I had a lot of a tan and olive plaid.  Neither a light, nor a medium, it had been rejected so many times. 

In a totally uncharacteristic moment, I decided to use it as my background.  Paired with browns and golds it just says 'Autumn' doesn't it?  Not as scrappy as Kathleen's pattern, but it used pieces that were already cut to the correct size, cut-off's from a previous project.    That's a WIN in my book!  Here's the result:
Autumn Sewing Box Scraps 24x29
The plaid background makes it look kind of primitive.  It's tempting to applique a sunflower and crow, or something in Cheri Payne style, in the lower right third of the quilt.  Hmmm...

Tuesday, July 3, 2018

Not quite according to plan

Sometimes I think about half my quilts don't turn out according to the original plan.  How about you?
Interlocking Stars 45 x 53 top

This top is called Interlocking Stars and is from the book:  Quick and Easy Projects for the Weekend Quilter, edited by Rosemary Wilkinson 2002.

The original plan was to make it larger than the book pattern to fit a twin bed.  Somehow, I made way too many navy squares into HST's and then didn't have enough squares to even finish the original pattern.  You would think as a Math major in college I'd know how to count. Tsk.  Had to take apart a couple HST's and piece them back into squares for the centers of  the last 4 stars!

That left me with a whole bunch of HST's leftover.  How about a pieced border?  Exactly enough! 

These fabrics had been in the stash too long with no particular purpose and now they're used up. Hooray! There is still plenty of the solid tan for backing.  I think that came from my mother's stash.  (wow that's old!)

I think it will make a great picnic blanket.  The colors seem rather dull, but they all go together perfectly.  Well, it won't show the dirt!  LOL

Friday, June 29, 2018

Remember Cheri blocks 1 and 2

With the recent loss to the quilting world of Cheri Payne to cancer, many are remembering her by making projects using her designs.  Cheri was a wonderful designer of primitive works of embroidery, wool applique and cotton piecing.

Her dear friends are sharing primitive designs on Facebook in distinctive Cheri style, and encouraging a sew-along in her memory.
May: block #1  Remembering Cheri
I've chosen cotton applique' by machine, rather than hand applique' wool, and am using fabrics from my late Dad's shirts as much as I can.  Applique' never holds my interest for long, but Cheri's designs have taught me that matching everything is overrated, and wonky can be wonderful.  There are times to free your spirit and just 'make do'.  The result is charming.
June: block #2  Remembering Cheri

Tuesday, June 26, 2018

A little basket of summer

Kathleen Tracy has a Facebook group and she encourages us to make a little quilt each month.  This month's challenge was using small basket blocks.  I had a couple of 3-inch basket-like blocks in my orphan block box, along with another pair of blocks that had the same background. 

Slapped those babies together in a heartbeat!  And it turned out so cute!  Just a little 12-inch quilt top.

Thursday, June 21, 2018

What to do with selvages

Have you ever come across projects using the selvage edges of your quilting fabrics?  I've seen a few, and started saving the edges.  And saving, and saving.  Until I had two gallon size Ziploc bags full and still no idea what to do with them.  Time to dive in!

First I sorted the strips by length.  That made it easier to overlap them and top stitch them together into strips about 6.5 inches wide.  Next, I cut those into squares using my 6.5 inch ruler.  It was all pretty arbitrary, but that's the size ruler I had on hand, and things just seemed to work out.

My layout inspiration came from Bonnie Hunter's pattern "Basket Weave Strings", one of her free patterns.  The alternating whites and colors of selvages worked like a dream!

Some things I learned:  
1)  When cutting selvages make sure you keep about 1-inch of the print above the white strip.  You will lose 1/4 inch in the overlap seam and less than 1/2-inch of color showing looks too skinny.
2)  Lights and whites don't work very well unless they have a definite print.  It just all blends together as one big white strip.
3)  Start each strip set with a selvage that is all color and at least 1.25 inches wide. (see the green edge strip in the photo above)  A white strip just gets lost in the seam allowance and you get such a tiny white sliver showing that it looks funny.
4)  When sub-cutting strips into squares, re-adjust and square up every couple of cuts.
5)  It is not necessary to use any stabilizer under the strips.  I just overlapped the white finished edge over the colored edge of the next strip and top stitched them together.  A little spray starch might have helped keep things square, but with only 6.5 inches width, it was easily manageable.


Basket Weave Selvages  60x60 inches before borders. 
Sorry the photo is so dark.  We've had a lot of rainy days here recently.
Here's the top.  The setting triangles are a very dark green and it still needs a couple of borders - yet to be determined.  

This was a LOT more fun than I expected!  You've got to try it!


Wednesday, May 2, 2018

Using up some Fives

Scrap Squares 41.5 x 55.5 inches
Have I shared this one with you yet?  In a recent attempt to try and use up some 5-inch scraps I came across this great pattern.  It's from Fons & Porter's Easy Quilts -Scrap Quilts, Fall 201.  The designer is Kaye England, and the pattern is called Kaye's Scrap Squares. 

It was super easy to make!  I down-sized it a bit to use 5-inch instead of the original 5-1/2 inch squares.  The piano key border that I added used up even more scraps. 

The only difficulty I had with this quilt is the batting.  I pieced together some batting scraps that were lying around and have no idea how old, or what brand they were.  In quilting this up I used a Crayola ultra-clean washable marker to mark the loopy hearts in the gray border.  The marking washed out perfectly, but the batting bearded something awful in the wash.  Totally unexpected!  Guess I'll be keeping this one.

The 5-inch scrap bag is still full, but at least it's not bursting out all over.  I usually don't make the same quilt pattern twice, but this one would be tempting.

Thursday, April 26, 2018

A couple small quilts

Spring is coming slowly this year, and it has given me time to finish binding a couple of small quilts.

The first, as yet unnamed, sprang from a desperate need to reduce the scraps in my 5-inch scrap bag.  It hardly made a dent!  The starting point: five remaining tan squares from a border print dress I made way back in the 1980's!   They were all that was leftover after making this table runner a few years ago.
33 x 37-1/2 inches

The second is a small quilt that used up all the pink/white squares remaining from a whole-cloth baby quilt that I made two years ago.  Little tan bunnies, frogs, turtle and dragonflies make these fussy-cut blocks shine.  Perfect for Easter!
30 x 32 inches
And finally, a little 13-inch square blue and white quilt from Kathleen Tracy's book Small and Scrappy.  The light fabric was cut from a blouse that my late mother had sewn for herself.  It's not 100% cotton and was hard to work with.  It just wouldn't stay square.  All kinds of wonky!  And, of course, I was too lazy to get out the spray starch to keep it in line.  But it turned out pretty well, and it will always remind me of Mom.  Here it is with my Aunt Mary Ellen's old Singer.

13-inch square blue and white quilt 


Monday, April 16, 2018

Not Exactly Pfeffernusse

A chance find at the thrift store provided me with yards and yards of a lovely rich brown quilt shop fabric with hazelnuts, red berries and a hint of gold.  They had a former life as curtains and matching valances.  But I had new plans for them! 

Close-up of the brown Curtain and white Shirting fabrics.
With all good intentions this quilt top started out to be Bonnie Hunter's "Pfeffernusse" from String Fling.  The wonderful browns and reds seemed a great fit.  But, I wanted to really feature the brown fabric and not cut it up in small pieces. 

 First alteration... use the brown fabric in place of the string pieced scrappy browns.

Second alteration... if I wasn't string piecing the brown could I get away with a neutral stripe instead of piecing?  Out came a white stripe shirting from my mother's stash.  That's deep stash!  Let's just say I remember this fabric from around 1970 when she tried sewing dress shirts for Dad.

Queen size top
Time went by and things were going along really well.  All the blocks were pieced and it came time to put them together.  Hmm...The large brown pinwheels of Pfeffernusse just weren't speaking to me.  It looked a little blotchy.  Probably because I used large pieces of fabric instead of string piecing.

Third alteration... re-arrange the blocks.  How about a barn-raising pattern?  Yep, looking better.

Don't you think those curtains should be pleased at how nice they look now?  And, I have two curtain panels and a valance left over just in case this ends up in a room with a window that could use matching cafe' curtains.

Sometimes quilts just name themselves, but this one is eluding me for the time being.  It doesn't look anything like the original pattern.  Take a look HERE.

Tuesday, March 6, 2018

Calendar Girl

Another finish from the UFO pile!

Calendar Girl 83 x 93 inches
'Calendar Girl' is a queen size Row-by-Row quilt of the months of the year.  It started in 2011 when Lyn Brown posted free patterns on her web site for a monochromatic row-by-row quilt.  Quite a challenge for her students!  But, I saved the patterns and made a number of them in full color rather than monochromatic.

The blocks I used for January, March, May, July, August, and September are all from her patterns.  Then I branched out a bit.  I used her baskets for April, but added Easter eggs from a great pastel striped fabric instead of her rabbits. The rest are other row-by-row patterns I found or blocks that I made up into a row, and are totally different from Lyn's quilt. 

The song 'Calendar Girl' kept running through my head as I quilted, and so that's what I named her in the end.  Why not?

"I love, I love, I love my little Calendar girl.  Every day, every day, of the year!"

Saturday, March 3, 2018

Pilgrim Ships

Here it is, March already!  The resolve to finish up some languishing UFO's this winter is still going strong.

The next project I tackled was what to do with this piece of wonderful fabric that I have had for years!  The colors are so soft and lovely.  Rich brown and rust, purple and teal.  It's called Pilgrim Fathers designed by Fabric Freedom, London England.  The squares have tall ships, a deer, a fish and a goose (or brown swan maybe.)

Quiltmaker Magazine had a pattern a few years  back called "Chopsticks."  Some adapting had to be done to fit the size squares from my feature fabric, but all worked out in the end.


Here's the final result.  The quilting and binding was finished by lunch time today, then a quick spin in the washer and dryer to get out the markings in the border.  Whoop Whoop!  Nearly every bit of that fabric was used up too.  There is only one square and four partial squares left for the scrap bin.


This is my third Queen size finished up since New Years.  I'm stuck on the next one, but that's another post.

Linking up to share with:
confessions of a fabric addict

Monday, February 19, 2018

A pair of February finishes!

This weekend up at the lake, while the guys were ice fishing, my project was to hand sew bindings on two little quilts.

The first is the February challenge from Kathleen Tracy.  "Windowpane" is from her book "Small and Scrappy." This one's entirely from my scrap bag.  I was trying to use up some of those mid-tone fabrics that I always seem to put back.   I wasn't sure I had enough contrast when I first put it together, but it's growing on me.

And, finished just in the nick of time, is this small Delectable Mountains quilt for my DIL who wanted a purple table topper.  We celebrated her birthday this evening.  The block is from Bonnie Hunter's "Scrappy Mountain Majesties," which I've been wanting to try out.  It went together very easily!  I might be persuaded to make a Scrappy Mountain quilt one of these days.

Saturday, February 3, 2018

Tutorial: Apron for Care Center Residents

Many of us will have to face an elder loved one moving into Assisted Care or a Nursing Home.  As "Dad" has advanced into his 90's his hands tremble a bit, and eating in the dining hall has become frustrating.  He became discouraged that he spilled so often, but staunchly refused to wear a 'bib.'  And who can blame him?  He has had to let go of his dignity and independence in so many ways.  It was time to figure a way to help him out.

 The answer came when my husband's company changed their corporate logo.  The old shirts, though in great condition, were about to go out to the thrift store.  That is, until I got ahold of them. 

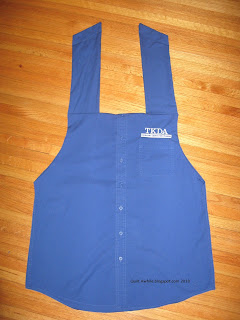
This is the result:  A double layer apron that looks like a man's dress shirt. The double layer keeps wet spills from soaking through before he can grab a napkin. It's wide and long enough to give good coverage down onto his lap.  No ties or buttons for arthritic hands to fumble with, and it doesn't pull over his head.  The weighted straps just rest over his shoulders.   It even has a pocket for his silverware or cell phone.  And, it went together in an hour!

He loves it! "Dad" wears one at every meal.  It's easy for him to put on and take off, has saved a ton of effort on laundry and he doesn't feel it's demeaning.  He's proud of his son, and pleased to wear his old company logo.  Win, win!

Here's how it's done:

Materials:  
* one men's medium weight, long sleeved dress shirt.  (I used chambray and a light twill size Large Tall.)
* six old fashioned disc drapery weights.  You could use quarters too, but would need about 3 in each of the six pockets to have enough weight.
* sewing machine, scissors, marking chalk, thread and sewing pins. (Rotary cutter, cutting mat and 5-inch wide ruler optional.)

Step one:
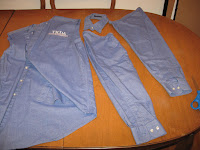
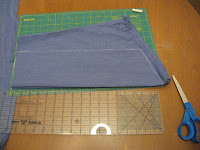
step 1: cut off collar and sleeves
With scissors, cut off the collar and sleeves.  Discard collar.

Step two:
Turn the shirt inside out.  Spread out the shirt.  The back will probably be a little wider than the front.  Use pins to extend the center pleat farther down on the shirt back.  This will take up the extra fabric for now. The sleeve opening front and back won't exactly match.   Smooth out and draw a gentle curve around the armholes from a point a bit below the armhole and re-cut so they match. 

step 2: pin to extend pleat in back


Step three: 
Cut straight across the top above the top button, but below the back yoke. I had to cut off the collar buttons because they were just where I wanted to cut.  Make sure you don't cut through the pins holding the back pleat together.  You can't see them from the front!  Stitch the curve from side seam to top opening.  I used a standard seam allowance.  Then, stay stitch across the pleat in the back so it doesn't shift.

step 3:  cut straight across the top, below the yoke
Stitch curved side seams.


Step four:
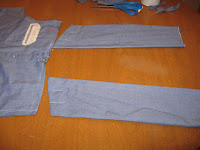
Next, smooth out the the sleeves.  Cut off the cuffs right above the placket, parallel to the cuff edge.  Discard the cuffs.  Turn sleeves inside out.  Using the fold of the sleeve as one edge, cut a five-inch wide strip from shoulder to cuff.  Trim the top edge at an angle, cutting off the seam at the top of the sleeve.  (The cuff end will be attached to the apron, the angled end will have the weights.)

step 4: cut off cuffs


step 4: 5-inch strip and angled edge cut
Step five:
Sew the long side and the angled side of the 5-inch strips to make the shoulder straps.  Turn right side out.  Place your weights along the angled side and mark with chalk to make three little pockets.  This helps keep the weight distributed during use, and they don't all fall to one corner.


step 5: sew and turn straps. note the angled edge


Step six:  
Stitch the three pockets by sewing lines about 2-1/2 inches long or so up from the bottom.  Drop in your weights.  Then stitch across just above the weights to keep them in the pockets.
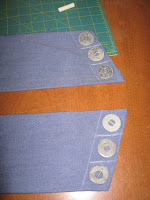
steps 5 & 6: marking pockets for the weights

  Step seven:
With the shirt still inside out, slip the shoulder straps between the front and back.  Place the strap at the very outside edge on both sides.  The longer point of the angled, weighted edge should be toward the center, and slid down between the front and back shirt pieces.  Stitch across the top edge, catching the front, the raw edge of the straps, and the back all together.  Turn right side out.  All done!
step 7: slide straps down into the shirt,
points toward the center
straps all the way to the outside edges


step 7: stitch top edges
Turn right side out.  All done!

Friday, February 2, 2018

Little Dresses for BIZAA

Last spring our Church was asked to participate in a sewing project making little girls dresses for a mission trip to Nigeria.  We took up the challenge and made over 100 pillowcase-style sundresses from the Little Dresses for Africa pattern.

The mission group we are working with is called BIZAA.  They specifically work to get children off the Streets and out of Child Labor and into the Classrooms in southeastern Nigeria.  They sponsor children in elementary and secondary schools and now have a vocational school for them as they get older to learn nursing and computer technology. 

The founder of the organization is originally from that area, and now works for a church in the Twin Cities.  When he travels back to Nigeria he brings the dresses and other needed items.  But, he mentioned that the pillowcase-style of dress isn't really appropriate for the girls to wear to Church.  So, I'm working on a design for a simple dress that has a drop shoulder sleeve.

Here's what I came up with today.  I think it will work.  No zippers or buttons, will pack flat, reasonably easy to cut and sew.  Now I have to draft up patterns in a whole bunch of sizes.  And how about that 1960's fabric that was in the donation box?  Back in style again!

Of course, now that I've done all this, I see that there is a new raglan sleeve pattern available from Nancy's Notions.  But I think I like my version better.  No elastic or draw-strings.  Well, I can give our sewing crew a couple of options when we have our sewing day in March.

Sunset On Smith Lake

After quilting up a queen size Charlotte's Baskets, it was time to do a bunch of piecing - just to break things up a bit.  I'm so happy to report that my version of Bonnie Hunter's On Ringo Lake Mystery Quilt is all pieced together!


It's surprising how many corners needed to meet, and that they actually matched pretty well.  I didn't try to pin anything, just held nesting corners together where they happened.  The quilt top is about 75x90 inches right now.  Usually I like square 90 inch or larger quilts for our queen beds.  Then no one can steal all the covers!  Since it will be a while before it's quilted, I'll have to decide whether to add a border on two sides to square it up, or leave it as is and use it on the full size bed at the Lake.

Here's a couple sunset photos from our Lake.

Not a bad color match!

I think I can get in on the last link-up. Check out all the beautiful quilts!  https://quiltville.blogspot.com/2018/02/one-final-on-ringo-lake-link-up.html

Wednesday, January 31, 2018

Charlotte's Baskets

Sew excited to share this finished quilt!  My sewing machine really gets humming in January and February here in the Bold North - or Cold North depending on your point of view. 

Charlotte's Baskets is queen size and a Bonnie Hunter pattern from her book String Fling.  I had made up quite a few scrappy string blocks just for fun, and found this pattern was the perfect way to use them all up. 

Originally, I started quilting in a Baptist Fan pattern, but after using up one bobbin I set it aside.   My shoulders were so tense from manipulating it through the machine.  Weeks went past, and the Holidays too.  Resolving in the new year to get going on some UFO's, I decided to rip out the fans and go with a more straight-stitch grid pattern with the walking foot.  Triple Zig-zag on the widest and longest setting looks great on the navy sashing and border.  The only free-motion quilting is some loops and stars on the string block corners and in the string border.

A new marking method worked okay.  I used a gray ultra washable Crayola marker on the orange border.  The markings were sharp and did not fade or brush off like chalk markings have.  The marks don't come off with just a damp towel.  I had to wash the whole quilt, but they all came out. 

The next unquilted top has been layered and pinned.  All set to go!

Saturday, January 20, 2018

2017 Year-end wrap-up

Time to take stock of what got done when I had time to Quilt Awhile this past year.

The fabric stash was decreased - at least I think so.  From what I kept track of, it looks like I used up 80 yards of fabric and only bought 49 yards.  A concentrated effort was made to shop my stash first, and only buy what I need to complete a specific project.  Did pretty well until the end of the year sales. (sigh)  But, it is the first year I've had a net decrease in yardage since I started keeping track.  Hooray!

My best UFO accomplishments were to finally quilt up two of my Bonnie Hunter queen quilt tops from previous years, and finish piecing the queen size Calendar quilt top started years ago.

My new skill for the year was to make two wall hangings with wool applique.  I'd never tried that before.  (There's one more in progress, but I've stalled out for now.)

Completed quilts:
4 Queen or larger:  Three Bonnie Hunter designs were quilted and finished this year -Easy Street,  Celtic Solstice, Alietare
In addition, there was a flannel and denim quilt for my DD and SIL that was at least Queen, maybe King.  It sure seemed like a beast going through my DSM.

3 Lap Quilts:  Courthouse Stars, Medallion sew-along, and the State Parks bed runner.

1 Baby Quilt: State Parks

2 sets of 4 placemats:  Halloween/autumn, Let it Snow (Christmas gift)

But it must have been the year for table runners and wall hangings.

5 Table Runners:  Vertical and Horizontal Garden Baskets (one a gift), Birthday, LeDuc Bunnies, and the pink one from the thrift store pants.  (I still haven't named that one but it turned out so much better than it sounds. ha!)

6 Doll and Mini Quilts: Log Cabin mini, Striped sashing doll quilt (gift), two Lighthouse wall hangings (one a gift and one for me), Palmateer Point doll quilt, Tulip mini.

5 Wall hangings and Table Toppers:  Blackbird Gathering, White table topper (gift), Green table topper (gift), Spirit of America (gift),  July leftovers.

2017 also saw the completion of a couple of pieced tops:
2 Queen: Charlotte's Baskets and Calendar row-by-row
1 Mini: Crow's Foot

That may not be all of them, but it's all I can come up with for now.  All in all, a pretty productive year for quilting. Thanks for all the times you've stopped by my blog this year, and all your encouragement.  Love to read your comments!  Here's to another year ahead of quilting fun together!

Friday, January 19, 2018

Crow's Foot

Crow's Foot - 21 inches square
On Ringo Lake is coming along, but I never can work on just one quilt project at a time.  Just need to mix it up a little, you know? 

Kathleen Tracy makes such adorable small quilts, and every month she puts out a challenge to sew along on one of her designs.  January 2018 is Crow's Foot from her book Small and Scrappy. 

Looking at her quilt, I decided that the border piece would actually determine the rest of the quilt fabrics.  There was a 14 inch striped piece in my scrap bin that was from some fabric samples gifted to me at least 20 years ago.  Perfect!  Then, time to do some math so that it could ALL be used up.  The main blocks were made a bit larger than Kathleen's pattern to make it all work out. The colors are deep dark blue and a rosy mauve.  Kathleen's small quilt finished at 15.5 inches and mine is 21 inches.

The weather cooperated, so I snapped a quick photo outdoors.  Then, off to sandwich and quilt.  The hand stitching on the binding is all that's left now.  Hopefully it will be my first finish of 2018!


Thursday, January 4, 2018

Frosty Babies

Frosty Babies wall hanging
Last Christmas (2016) I made four seasons wall hangings for our son & DIL at Christmas.  The Winter design was a Christmas candle.  Lovely, but it went out of season pretty quickly, because January, February and March are clearly still WINTER here in Minnesota!

So, my plan for this Christmas was to make another winter wall hanging for their kitchen that would last through the winter months.  I found the perfect pattern at our annual Police Dept. book sale last June.  Frosty Babies, by Brandywine Design, with adorable applique snowmen!

I picked out three of my favorites and turned them into a great winter wall hanging.  Wish I could have put one more solid border around the whole thing so that the 9-patches didn't disappear into the binding, but it would have made the wall hanging too wide. 

There was enough Let it Snow fabric (which I used as backing) to make four matching placemats too!

Tuesday, January 2, 2018

Ordinary Green

table topper about 18x22
The second small quilt for our DIL this Christmas was green.  Green is the liturgical color for "Ordinary time" which is mostly the weeks during the summer and fall, but also a couple weeks between the end of the Christmas season and Ash Wednesday.

One set of four blocks remained from the fabric I used to make our DD a table runner/wall hanging this past spring.   There's more about it here.  

The border design is from Fall Splendor by Julie Weaver that I found in a book called "Quilts With Unique Borders" from Annie's Quilting.